Thursday, March 20, 2025

Kickstart Your Biogas DIY with Cow Dung—The Easy DIY Guide

Ready to turn cow poop into cooking gas? Yep, you read that right!

If you’ve got a home biogas system or you’re thinking about building one, the first step is getting it up and running with a biogas starter culture. Sounds technical, but don’t worry—this is a super easy, DIY method that works like a charm. It’s all about giving your biogas digester the bacteria it needs to start producing methane gas from food waste.

In this guide, I’ll show you how to make a biogas starter culture using cow dung. It’s cheap, beginner-friendly, and something I use on my own small biogas systems at home and at the office. Once you set this up, your digester will be pumping out biogas in no time!

What’s a Biogas Starter Culture (And Why You Totally Need One)?

Think of a starter culture like the “probiotics” for your biogas digester. Without it, your system’s just sitting there. But with the right bacteria—aka methanogens from fresh cow dung—your digester will be converting waste into renewable energy (hello, free cooking gas!).

So if you’re wondering how to start a biogas digester at home, this is step one: give it life with a cow dung biogas starter.

What You’ll Need to Make a DIY Biogas Starter

You don’t need fancy gear. Here’s the simple stuff:

  • Fresh cow dung (this is the hero ingredient for making biogas starter culture)
  • Clean water (non-chlorinated so it doesn’t kill the bacteria)
  • A bucket or drum (for mixing your cow dung slurry)
  • A stick for stirring
  • Gloves (optional… but I highly recommend!)

Step-by-Step: How to Make a Biogas Starter Culture with Cow Dung

1. Collect Fresh Cow Dung

Fresh is key! The methane-producing bacteria are most active in fresh cow dung, so try to collect it on the same day. You’ll need about 10 to 20 kilos, depending on the size of your home biogas digester.

2. Mix It into a Cow Dung Slurry

Grab your bucket and mix the dung with clean water. Use a 1:1 ratio—one part dung, one part water. Stir it until it looks like a smooth slurry. This is your biogas digester starter.

Fun fact: this slurry is loaded with methanogens that break down organic material and release biogas, mostly made up of methane.

3. Let It Sit and Pre-Digest (Optional but Helpful!)

Leave your cow dung slurry in the bucket for 3 to 5 days. This gives the bacteria time to multiply and get hyped up before they move into your biogas digester. Keep it shaded and loosely covered.

4. Pour the Starter Culture Into Your Biogas Digester

Now pour that powerful biogas starter culture into your digester. Aim to fill about a quarter to a third of your system. This lays the bacterial foundation that’ll keep your biogas production steady.

5. Start Feeding—But Go Slow!

For the first couple of weeks, feed your home biogas digester small amounts of soft, easy-to-digest food waste. Think veggie scraps, fruit peels, and blended leftovers. No meat or oils yet—your bacteria need to get comfy first!

Pro Tips for Successful Biogas Production

  • Keep your digester warm (30°C to 40°C). If it’s too cold, your methane production will slow way down.
  • Stir it occasionally to keep things mixed and happy.
  • Be patient! It takes about 7 to 14 days before you start seeing that precious biogas.

FAQs About Biogas Starter Cultures (For Real People Like You!)

How long does it take to produce biogas after adding the starter?

Usually, you’ll see gas bubbling up in 7 to 14 days. The first gas is mostly CO₂, but soon you’ll get that good methane-rich biogas.

Can I use old cow dung for my biogas digester starter?

Nope! Old or dried dung won’t have enough active methane-producing bacteria. Fresh dung is a must for a healthy starter culture.

What’s the best starter for a biogas digester?

Fresh cow dung is the easiest and most reliable starter culture. Buffalo, goat, and pig dung can work too, but cow dung is the go-to for most DIY biogas systems.

Why isn’t my biogas system producing gas?

Check if your biogas digester startup has the basics right:

  • Is the temperature warm enough?
  • Are you feeding it the right things?
  • Is your pH balanced (between 6.5 and 7.5)? Sometimes, you just need to give it a little time and TLC.

Wrapping It Up: Your Biogas System is Ready to Rock!

And there you go! Making your own biogas starter culture with cow dung is easy, affordable, and super effective. Once your home biogas system gets going, you’ll be turning kitchen scraps and food waste into clean, green renewable energy.

If you give this DIY cow dung slurry method a try, let me know how it works out! Drop your questions in the comments, or tag me with pics of your biogas digester in action. I love seeing how people are turning waste into power!
 

Need Biogas Now?


Monday, March 17, 2025

Why Does My DIY Biogas Smell Bad? (And How to Fix It Fast)

So you built your biogas digester, and instead of smelling earthy and natural, it smells like rotten eggs or sewage. Yikes! I’ve been there, and I promise, it doesn’t mean your system is doomed. Smells are one of the most common issues with home biogas systems—especially for beginners. But the good news? Once you figure out why it’s happening, it’s actually pretty easy to fix.

What’s Normal and What’s Not?

First, let’s get something straight—some smell is totally normal. You are breaking down organic waste in an airtight container. But if you’re hit with an intense rotten egg smell (think sulfur), or a super nasty sewage stink, your system is waving a big red flag. These strong odors usually mean the balance inside your digester is off.

1. Overfeeding the Digester

One of the most common reasons for bad smells is overfeeding your digester. It’s tempting to throw in all your kitchen scraps at once, but the bacteria inside your system can only eat so fast! If you overwhelm them, the system becomes too acidic. The wrong bacteria (the stinky ones) take over, and the result is bad smells and sluggish gas production. To fix this, stop feeding it for a few days. Let the system catch up and stabilize. Once things settle down, go back to feeding small amounts regularly, instead of big loads all at once.

2. Not Enough Mixing (Dead Zones)

Another cause of nasty smells is when parts of your digester aren’t getting enough movement. If waste settles at the bottom or in corners without mixing, it starts to rot instead of breaking down cleanly. That rotting waste is what gives off the awful stink. If you have a small system, gently stirring it every few days can make a huge difference. If your setup is sealed and you can’t open it easily, make sure your inlet pipe creates some natural mixing as you feed in new material.

3. Leaks in the System

Sometimes the problem isn’t inside the digester, but with the pipes. If you smell gas outside your system—especially a sulfur smell—you might have a gas leak. Hydrogen sulfide is a common byproduct of biogas, and it stinks like rotten eggs. To check for leaks, brush soapy water over all your seals, joints, and pipes. If you see bubbles forming, you’ve found your leak. Seal it up with silicone or replace any cracked tubing. A tight system is a happy system!

4. pH Is Too Low (Acidic Conditions)

Your biogas microbes are picky about their environment. They prefer a neutral pH, right around 7. If your digester becomes too acidic (below 6.5), the methane-producing bacteria slow down, and the acid-forming bacteria take over. This not only stops gas production but also creates awful smells. To fix it, test your digester’s pH with simple strips or a digital meter. If it’s too low, sprinkle in some baking soda or wood ash to gently raise the pH. Also, stop feeding the system until things balance out again.

5. Wrong Type of Waste

What you feed your digester really matters. Some types of waste, like meat, dairy, and oily foods, break down much slower and can cause bad smells. They’re also more likely to attract the wrong bacteria. If your system smells funky, take a look at what you’re feeding it. Stick to vegetable scraps, fruit peels, and starchy leftovers like rice or bread. Avoid dumping in anything fatty, greasy, or animal-based unless you have a more advanced setup designed for that.

Pro Tips to Keep Your Biogas System Smelling Fresh(ish)

The best way to prevent bad smells is to be proactive. Feed your digester in small, regular amounts instead of big dumps. Keep the temperature steady—cold slows down digestion and heat speeds it up (but too much heat can hurt the bacteria). If you want to take it to the next level, add a simple gas filter between your digester and your gas storage. Activated carbon or iron filings work great to strip out the smelly hydrogen sulfide before it gets to your stove.

When to Worry (And When Not To)

If you smell gas around your stove or gas lines, stop using it and check for leaks right away. That’s a serious safety issue. But if it’s just the digester smelling off, it’s usually something you can fix by adjusting your feeding or balancing the pH. Don’t panic—it’s part of the learning curve!

My Smelly Biogas Story (And How I Fixed It)

When I built my first biogas digester, it smelled horrible. I honestly thought I’d messed it up beyond repair. Turns out, I was feeding it way too much in my excitement to see fast results. I stopped feeding it for a week, added a little baking soda, and let it rest. Within days, the smell cleared up, the gas started flowing again, and everything went back to normal. Lesson learned: slow and steady wins the race.

Still Smells Weird? Ask Me!

If you’ve tried all of this and your digester still smells terrible, reach out! Drop a comment below. I’m always happy to help you figure out what’s going on and get your biogas system back on track.

💡 Related Posts You Might Like:
👉 How to Build a Simple DIY Biogas Digester
👉 What to Feed Your Biogas System for Maximum Gas Output
👉 Troubleshooting Guide: Why Your Biogas Isn’t Producing Gas
👉 DIY Gas Scrubber: How to Clean Up Your Biogas
👉 Biogas Safety: 7 Tips You Can’t Ignore


Need Biogas Now?


Wednesday, March 5, 2025

DIY Biogas System: Turning Your Food Waste into Free Energy

Ever wondered if you could turn your kitchen scraps into free energy? Well, you can! A DIY biogas system is a simple and effective way to recycle food waste while producing biogas, which can be used for cooking, heating, or even generating electricity. Plus, it’s a great way to reduce landfill waste and help the environment. If you’re beginner and curious about how it works and how to build your own, this guide is for you!


What is Biogas?

Biogas is a mixture of gases, mainly methane (CH4) and carbon dioxide (CO2), that forms when organic materials like food waste break down in an environment with no oxygen. This process is called anaerobic digestion, and it happens naturally in landfills, swamps, and even in animal stomachs! By capturing and using this gas, you turn waste into something useful instead of letting it escape into the air as pollution.


How Does a Biogas System Work?

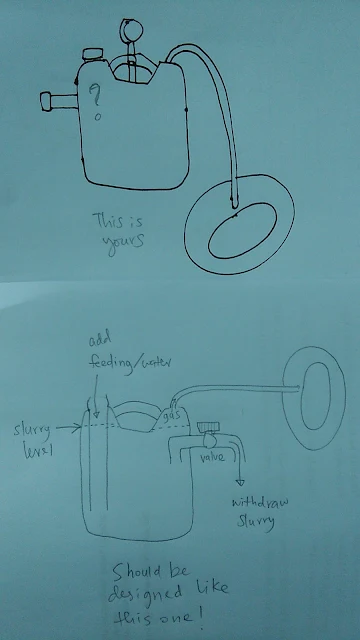
A DIY biogas system consists of a few key parts:


  • Digester Tank or Biodigester – This is where food waste goes. Bacteria break it down and produce biogas.
  • Gas Storage – The produced biogas needs to be stored in an expandable container like a drum or bag.
  • Piping System – Tubes transport the gas to where you’ll use it.
  • Outlet for Slurry – The leftover liquid (digestate) is a great organic fertilizer for plants!


The process is simple:


  • You add food scraps and water into the digester.
  • Bacteria inside break down the waste and release biogas.
  • The gas gets stored and can be used for cooking or heating.


What Can You Put in a Biogas System?

✅ Good Materials:

  • Vegetable and fruit scraps
  • Cooked rice, bread, and pasta
  • Leftover food (without too much oil or chemicals)
  • Cow, goat, or poultry manure (helps speed up the process)


❌ Avoid These:

  • Meat and bones (they take too long to break down)
  • Too much oil or fat (slows down digestion)
  • Chemical-based cleaners or detergents (kills bacteria)


How to Build a Simple DIY Biogas System

What You’ll Need:

  • A smaller container (for gas storage)
  • A PVC pipe and rubber hose for gas transport
  • A one-way valve (to prevent gas from going back into the system)
  • A tap or outlet for the digestate
  • A mixture of cow manure and water (to kickstart the bacteria activity)


 Step-by-Step Guide:

  • Prepare the Digester Tank
  • Drill a hole in the lid and attach a PVC pipe for gas outlet.
  • Install another outlet near the bottom for the digestate.


Set Up Gas Storage

  • Use an expandable drum or bag to collect the gas.
  • Connect it to the digester using a hose and a one-way valve.


Start the Digestion Process

  • Add a mix of cow manure and water first (this introduces bacteria).
  • Let it sit for a few days in a warm place.
  • Start adding food scraps daily.


Monitor Gas Production

  • After a few weeks, you should start seeing gas build-up in the storage tank.
  • You can test it by lighting a small flame (safely, of course!).


Use Your Biogas!

  • Enjoy free cooking fuel from your own food waste!


Tips for Best Results

  • Keep your system in a warm place (bacteria work best at around 30-40°C).
  • Stir the mixture occasionally to help the digestion process.
  • Don’t overfill the digester—give the bacteria time to do their job!
  • Use the liquid digestate as fertilizer for your garden or crops.


Why Build a DIY Biogas System?

  • Free, renewable energy – No more wasting food, turn it into fuel instead!
  • Eco-friendly – Reduces methane emissions from food waste in landfills.
  • Low cost – Most materials are cheap or easily available.
  • Sustainable waste disposal – A great way to manage organic waste.
  • Produces natural fertilizer – Your plants will love it!


Final Thoughts

Setting up a DIY biogas system may sound complex, but once you get started, it’s an easy and rewarding process. Imagine cooking a meal using energy made from last night’s leftovers—that’s sustainability in action! Whether you want to reduce waste, save money, or explore renewable energy, a small-scale biogas digester is a fun and practical project to try.

If you found this guide helpful, share it with others who might be interested in turning their food waste into free energy. Got questions or experiences to share? Drop a comment below—I’d love to hear from you!


Need Biogas Now?


Tuesday, March 4, 2025

Maintenance of biodigester

After several years of operating biodigester, the upper layer is full of floating scum. Middle layer is just digestate liquid. The most bottom is where the sediment reside. During maintenance, you may want to take out both layer of semi solid (scum and sediment) so you can start new fresh.

Accumulated scum if not removed, when they are piled up so much will block your gas outlet. This event may cause the biogas pushing down the digestate out towards the feeding inlet. So its good to do spring cleaning after sometime operating. 

The liquid digestate can be reuse since still containing microbes and as long as the pH still the same.

Need Biogas Now?


Monday, July 17, 2023

DIY Biogas Make and Use Your Own Renewable Natural Gas

Make your own homemade natural gas from food scraps, garden trimmings, and animal waste!

Understand how to craft a recipe to make your own renewable energy substitute for natural gas and propane.


DIY Biogas contains complete plans and parts lists with active links (Kindle edition only) to build two different biogas generators that help you learn, understand, and grow your biogas operation. With this hands-on, minds-on guide, you’ll gain the knowledge and experience you need to convert waste into energy. Whether you’re looking for a unique science project or want to cook meals with your own backyard biogas, this book is the most practical place to start.


With fuel prices and scarcity on the rise, it’s time to re-learn how to meet our own energy needs.
Start today and harvest your own local, renewable energy resource tomorrow!


Need Biogas Now?


Wednesday, November 16, 2022

How to purify your biogas

Purify your biogas using scrubbers.

Watch below:


How to calculate the sizing & volume (diameter & height) digester to be constructed

This is how Mark Aæ calculate the sizing & volume (diameter & height) to be constructed of floating and fixed type biogas for pigs, cattle & chicken

Tuesday, October 18, 2022

3 PRIME STAGES TO INITIATE BIOGAS

3 STAGES TO INITIATE BIOGAS:

1. Maturation of fresh cow dung starter

2. Acclimatization of matured starter to new waste

3. Optimization of feeding to obtain best ratio of waste to water, temperature and digester size for routine feeding
 

AT FIRST MY GAS IS BURNING BUT THEN STOP PRODUCING. WHY?

So, when the the first batch of biogas is produced, it showed that your dung starter is already matured and ready to produce next batch of biogas. But it is only the beginning. The number of microbes have already multiply several folds compare to fresh dung. Matured starter can produced biogas faster then fresh dung. However, you cannot jump to conclusion that you can add any waste in any amount. How would you push microbes from dung to suddenly adapt to digest waste from different sources? It is impossible! You have to start slowly introducing alien waste into this matured starter. So that these microbes could first learn to recognize then adapt to the new waste. Introduce the new different waste little by little until the sensitization process is complete. Introducing large amount of alien waste to a new digester will cause your starter became shock and stagnant. Give them time to learn. They are not machine but only living things like us. Have mercy ok.

WHY MY GAS IS NOT BURNING?

When I first initiate my digester with zero knowledge about biogas my favourite question was why is there no any gas produced? So you are very lucky if there is gas production by the new digester because carbon dioxide will come out first in the beginning before then methane. You have to understand that biogas is actually mix of several type of gas like carbon dioxide, methane and other inert gas. Along the process of biogas production, in the beginning of chain reaction, acidification will first occurr thus producing carbon dioxide. It is normal to have carbon dioxide in the very beginning. It is a positive sign that your digester is working well and will produce methane a bit later according to the chain reaction. Unless your digester is continuously producing carbon dioxide after months of starting then you have to start worry there might leakage somewhere along digester system.

Wednesday, July 20, 2022

Biogas Bag for Storage

Storage using gas bag is easy. Choose bag size big enough for own use or otherwise you will suffer since every time its full then you have to burn or flare the biogas for cooking. A bag full of gas you may not want it to get full to maximum because if it full will prevent additional gas going into it. What happen next is the excess gas will push the slurry out of digester. 

Need Biogas Now?


Thursday, April 21, 2022

Vertical Biogas DIgester Design

 Source: Joel Canaria

 Observe a typical design of a digester.

Inlet - feeding occurs here having the largest diameter among all.

Gas outlet - biogas produced from the process goes out thru here connected to external storage.

Overflow - where slurry displaced by a new feeding goes out thru here.

Stirrer - to make sure agitation takes place. Optional for some practitioner.

Drain - to let the accumulated sediment to flow out thru to be discarded after operating for sometime. 


Need Biogas Now?