Biogas digester design
I would like to suggest to all beginners to start small at 40-50 liters first for self education purpose in getting the first flame before going bigger.
In my case just use a standard normal dustbin.
Could you name the basic inner and outlet and their purpose in these photos?

On the lid has two opening. One bigger than another. The one bigger in the middle is inlet for the feeding purposes. Smaller opening observed is an outlet for biogas in which you have to further install valve and gas hose connected to inner tube or a gas bag for storage.

This is how its look like under the lid. Inlet for feeding has to extended towards below to ensure biogas does not escape through the lid. Also to make sure all feed goes down to the bottom. Observe the outlet for gas which only briefly short and does not extend deep to below. This is to make sure the release gas will go through that and collected in a proper storage. Also by this way the outlet won't easily get blocked by floating organic matter thus also halt gas move from the digester to storage via the gas outlet.


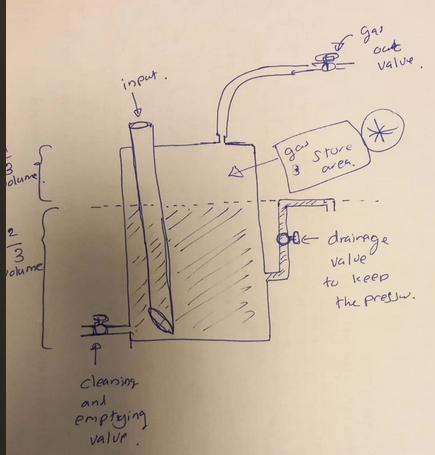
So, finally it will look like this setup. It is just you need to connect it to inner tube to store the gas. To give a better understanding please look at my dustbin digester drawing below.

.
Another example of using 50 liter container.


By now you should have already understand the critical system design.
Please join our Facebook Group to learn more about how to get started with biogas at home, share your own eco-friendly journey, and get tips from others on living a zero-waste lifestyle. We’re building a community of like-minded people who are making small changes for a greener planet — and we’d love for YOU to be a part of it!
Thanks you very much for your quick help.
ReplyDeleteYou are welcome. Thank you for finding the contents useful.
DeleteThanks so much you really Clare me from what I don't understand in biogas training love this sir
ReplyDeleteI am happy to know the training has made you understand the process.
DeleteThanks so very much more blessings to you for ever I
ReplyDeleteBlessings also to you. Thanks.
DeleteThanks alot sir, I now understand how it is being done
ReplyDeleteYou are welcome. I am happy for you.
Delete